はじめに
旅行に行く時に写真をよく撮るのですが、写真アプリにしまうだけであまり活用ができておりませんでした。今回は、そんな写真を一つのネタとして利用できる方法を共有したいと思います。(Pythonに対する知識はほとんど必要ありません)
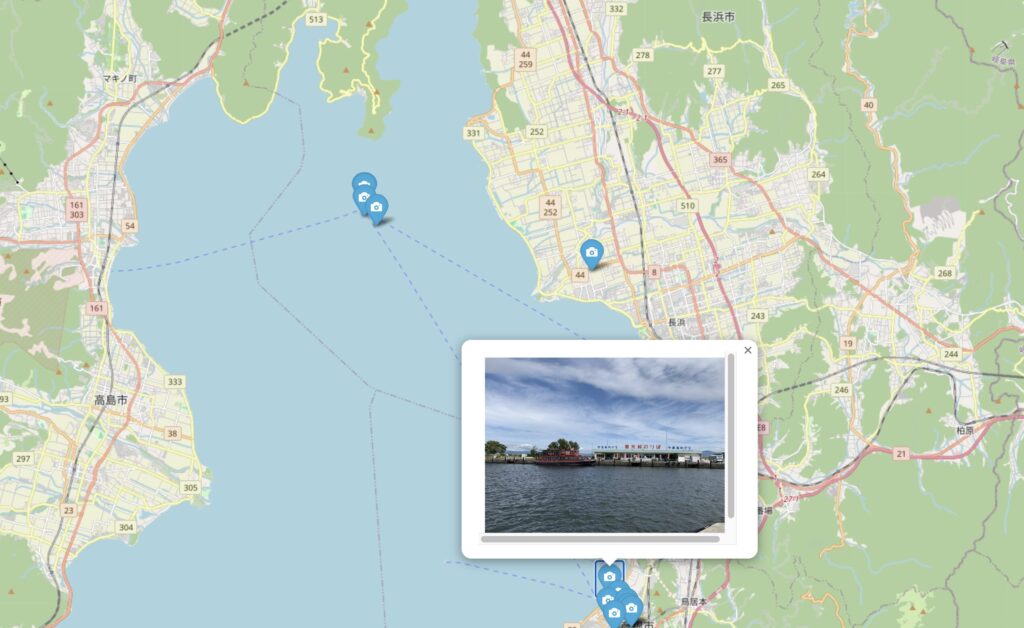
左の画像が今回の作成物で、マーカーをクリックするとその地点で撮影した画像を表示することができます!
滋賀県の琵琶湖に行ったときのマップになります。
概要
スマートフォンやデジタルカメラで撮影した写真には、撮影場所のGPS情報や画像の向き(オリエンテーション)などのEXIFデータが含まれています。この情報を活用して、写真を地図上にプロットし、クリックすると写真が表示されるインタラクティブなマップを作成する方法を紹介します。
必要なもの
- Google Colabが利用できる環境
- 自身のスマホで撮影した写真
必要なライブラリのインストール
Google Colabでライブラリを利用するために、コードセルに以下を入力して実行してライブラリをインストールしましょう。
!pip install --upgrade pillow
!pip install folium
!pip install exifread
!apt-get install libheif-examples
!pip install pyheif Pillow: 画像処理ライブラリfolium: 地図作成ライブラリexifread: EXIFデータの読み取りpyheif: HEIC画像の読み込み
ライブラリのインポート
ライブラリはインストールしただけでは利用できません。インポートもしましょう。
import os
import folium
import exifread
import pyheif
from PIL import Image, ExifTags
import io
import base64
画像の向きを補正する関数
画像のEXIFデータからオリエンテーション情報を取得し、画像の向きを正しく補正します。何度か試したのですが、微妙に修正できていません、、
def correct_image_orientation(img):
    try:
        exif = img.getexif()
        if exif:
            orientation = exif.get(0x0112, 1)  # デフォルト値は1(回転なし)
            if orientation == 3:
                img = img.rotate(180, expand=True)
            elif orientation == 6:
                img = img.rotate(-90, expand=True)  # 時計回りに90度回転
            elif orientation == 8:
                img = img.rotate(90, expand=True)   # 反時計回りに90度回転
            elif orientation == 2:
                img = img.transpose(Image.FLIP_LEFT_RIGHT)
            elif orientation == 4:
                img = img.transpose(Image.FLIP_TOP_BOTTOM)
            elif orientation == 5:
                img = img.rotate(-90, expand=True).transpose(Image.FLIP_LEFT_RIGHT)
            elif orientation == 7:
                img = img.rotate(90, expand=True).transpose(Image.FLIP_LEFT_RIGHT)
    except Exception as e:
        print(f"Orientation補正中にエラーが発生しました: {e}")
    return img
HEIC画像のJPEG変換とEXIFデータの保持
HEIC形式の画像をJPEG形式に変換し、EXIFデータ(特にGPS情報とオリエンテーション情報)を保持します。(※HEICはIPhoneで写真を撮った時に作成されるのですが、そのままでは処理が難しいので変換処理を入れています)
def convert_heic_to_jpg(input_path, output_path):
    try:
        # HEICファイルを読み込む
        heif_file = pyheif.read_heif(open(input_path,'rb'))
        # 画像データを取得
        image = Image.frombytes(
            heif_file.mode,
            heif_file.size,
            heif_file.data,
            'raw',
            heif_file.mode,
            heif_file.stride,
        )
        # EXIFデータを取得
        exif_bytes = None
        for metadata in heif_file.metadata or []:
            if metadata['type'] == 'Exif':
                exif_bytes = metadata['data']
                break
        # 画像の向きを補正
        image = correct_image_orientation(image)
        # 画像をJPEGで保存(EXIFデータを含む)
        if exif_bytes:
            image.save(output_path, 'JPEG', exif=exif_bytes)
        else:
            image.save(output_path, 'JPEG')
    except Exception as e:
        print(f"{input_path} の変換中にエラーが発生しました: {e}")
        raise e
画像のリサイズとEXIFデータの保持
画像をリサイズする際に、EXIFデータを保持しつつ、画像の向きを補正します。
def resize_image(input_path, output_path, max_size=(800, 800)):
    with Image.open(input_path) as img:
        try:
            # EXIFデータを取得
            exif_data = img.info.get('exif')
            # 画像の向きを補正
            img = correct_image_orientation(img)
            # 画像のリサイズ
            img.thumbnail(max_size)
            # EXIFデータを含めて保存
            if exif_data:
                img.save(output_path, exif=exif_data, optimize=True, quality=85)
            else:
                img.save(output_path, optimize=True, quality=85)
        except Exception as e:
            print(f"{input_path} のリサイズ中にエラーが発生しました: {e}")
            raise e
EXIFデータの取得(GPS情報の抽出)
画像からEXIFデータを読み込み、GPS情報を抽出します。
def get_exif(image_path):
    # 'rb'モードで画像を開く
    with open(image_path, 'rb') as f:
        tags = exifread.process_file(f, details=False)
    return tags

def get_gps_info(exif_data):
    gps_info = {}
    try:
        gps_latitude = exif_data['GPS GPSLatitude'].values
        gps_latitude_ref = exif_data['GPS GPSLatitudeRef'].printable
        gps_longitude = exif_data['GPS GPSLongitude'].values
        gps_longitude_ref = exif_data['GPS GPSLongitudeRef'].printable

        lat = convert_to_degrees(gps_latitude)
        if gps_latitude_ref != 'N':
            lat = -lat

        lon = convert_to_degrees(gps_longitude)
        if gps_longitude_ref != 'E':
            lon = -lon

        gps_info['lat'] = lat
        gps_info['lon'] = lon
    except KeyError:
        return None
    return gps_info

def convert_to_degrees(value):
    d = float(value[0].num) / float(value[0].den)
    m = float(value[1].num) / float(value[1].den)
    s = float(value[2].num) / float(value[2].den)
    return d + (m / 60.0) + (s / 3600.0)
画像の処理とBase64エンコード
画像フォルダ内の画像を処理し、GPS情報を取得、画像をBase64エンコードしてHTMLに埋め込みます。
# 入力フォルダと出力フォルダのパスを指定
image_folder = '/content/drive/MyDrive/画像フォルダ'  # ご自身のフォルダパスに変更してください
output_folder = '/content/processed_images'

# 出力フォルダが存在しない場合は作成
if not os.path.exists(output_folder):
    os.makedirs(output_folder)

# 位置情報付き画像のリストと位置情報なし画像のリスト
images_with_gps = []
images_without_gps = []

# GPS座標のリスト
coordinates = []

for filename in os.listdir(image_folder):
    input_path = os.path.join(image_folder, filename)
    # 拡張子を取得
    ext = os.path.splitext(filename)[1].lower()
    # 出力ファイル名を設定
    output_filename = os.path.splitext(filename)[0] + '.jpg'
    output_path = os.path.join(output_folder, output_filename)

    # HEIC画像の場合
    if ext == '.heic':
        try:
            # HEICをJPEGに変換(EXIFデータとOrientation補正を含む)
            convert_heic_to_jpg(input_path, output_path)
            # 変換後の画像をリサイズ(EXIFデータとOrientation補正を含む)
            resize_image(output_path, output_path)
        except Exception as e:
            print(f"{filename} の変換中にエラーが発生しました: {e}")
            images_without_gps.append(filename)
            continue
    else:
        try:
            # その他の画像(JPEG、PNGなど)の場合
            # リサイズ処理を行い、EXIFデータとOrientation補正を含む
            resize_image(input_path, output_path)
        except Exception as e:
            print(f"{filename} の処理中にエラーが発生しました: {e}")
            images_without_gps.append(filename)
            continue

    # EXIF情報を取得
    exif_data = get_exif(output_path)
    gps_info = get_gps_info(exif_data)

    if gps_info:
        # 画像をBase64エンコード
        with open(output_path, 'rb') as img_file:
            encoded = base64.b64encode(img_file.read()).decode('UTF-8')
        # データURIスキームを作成
        image_data = f'data:image/jpeg;base64,{encoded}'
        images_with_gps.append((output_filename, gps_info, image_data))
        coordinates.append((gps_info['lat'], gps_info['lon']))
    else:
        images_without_gps.append(output_filename)
地図の作成
Foliumを使用して、GPS情報に基づいて地図上にマーカーを配置し、ポップアップとして画像を表示します。
# 地図の中心を計算
if coordinates:
    avg_lat = sum([coord[0] for coord in coordinates]) / len(coordinates)
    avg_lon = sum([coord[1] for coord in coordinates]) / len(coordinates)
else:
    avg_lat, avg_lon = 0, 0  # デフォルト値(位置情報がない場合)

# 地図を作成
m = folium.Map(location=[avg_lat, avg_lon], zoom_start=12)

# マーカーを追加
for filename, gps_info, image_data in images_with_gps:
    # ポップアップに画像を表示
    html = f'<img src="{image_data}" width="300">'
    iframe = folium.IFrame(html=html, width=320, height=240)
    popup = folium.Popup(iframe, max_width=2650)
    # マーカーを地図に追加
    folium.Marker(
        location=[gps_info['lat'], gps_info['lon']],
        popup=popup,
        icon=folium.Icon(color='blue', icon='camera')
    ).add_to(m)

# 地図をHTMLファイルとして保存
m.save('map.html')
エラーリストの保存
位置情報のない画像をリストアップします。(エラーが出てしまった画像は残念ながら利用ができません、、)
# 位置情報のない画像をテキストファイルに出力
with open('error_list.txt', 'w') as f:
    for filename in images_without_gps:
        f.write(f"{filename}\n")
注意事項
- Pillowのバージョン: 必ず最新のPillowライブラリを使用してください。古いバージョンでは
getexif()メソッドが使えないため、エラーが発生します。 - 画像の向き補正:
correct_image_orientation関数で、オリエンテーション情報に基づいて画像を正しい向きに補正します。回転角度に注意してください。rotate()メソッドは反時計回りに回転します。- Orientationが6の場合、時計回りに90度回転させたいので、
-90度と指定します。
- 画像の埋め込み: 画像をBase64エンコードしてHTML内に埋め込むことで、外部ファイルへの依存をなくします。ただし、画像が多い場合やサイズが大きい場合、HTMLファイルが大きくなることに注意してください。
- フォルダのパス:
image_folderには、ご自身の画像フォルダのパスを指定してください。Google ColabでGoogle Driveのフォルダを使用する場合は、ドライブをマウントする必要があります。from google.colab import drive drive.mount('/content/drive')
まとめ
以上の手順で、画像のEXIFデータを保持しつつ、画像の向きを正しく補正し、地図上に画像をプロットすることができます。旅行や散歩などで撮影した写真を地図上に表示して楽しむことができます。
本記事が、Pythonで画像処理と地図作成を行う際の参考になれば幸いです。
参考リンク: